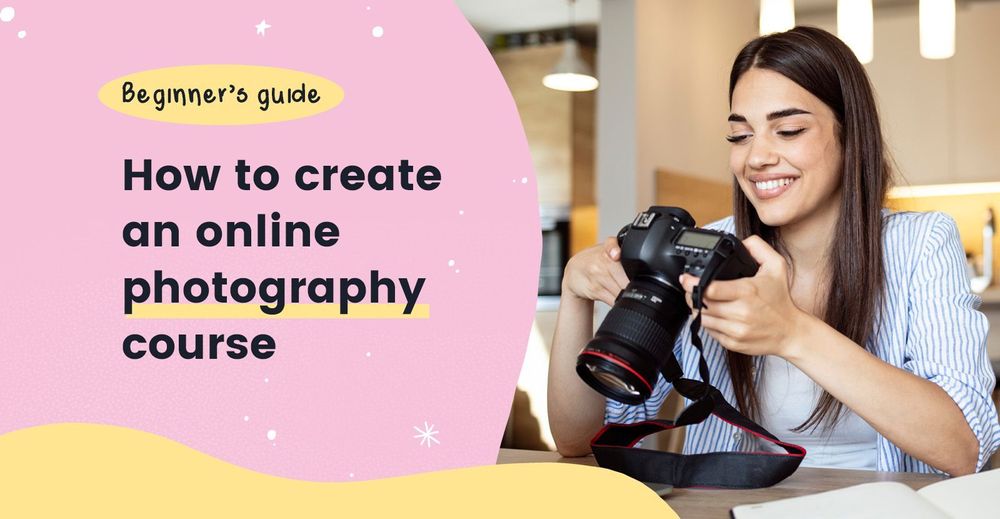
The 5 essential steps to designing an online photography class
HOME - GUIDES - ONLINE PHOTOGRAPHY COURSE
This step-by step guide will help you learn the process of creating online courses in photography using CreativeMindClass, a free tool used by top creators.
- Start creating your online photography course
Whether you're a beginner or a seasoned pro designing an online photography class isn't easy. There's an endless amount to contemplate and think about. Starting with the concept, you can video, research launches, and more. A great plan sets the stage for your the best possible outcome. It allows you to organize each aspect to ensure that you create the most memorable learning experience for your students.
In this article, you'll learn the 5 crucial steps needed to create an effective online photography course...
1. Online course plans Create a space to create your online course
2. The topic of your course: Determine your course's topic and the students you'll instruct.
3. Course outline Plan each lesson you need
4. Content delivery Make videos, downloadable files and exercises
5. Website for your course Persuade your customers to make a purchase with the help of texts and images
1. Online course plan
Create a space to create your online course
Traditionally, an online course might be scattered over social media, web sites, payment pages, messages emails, messages, and laptop folders. The central online course brings all the various elements into one convenient place. It will evolve over the lifespan of your online course but usually includes:
- Introduction
- Work Examples
- Information on gear
- Inspiration
- Planning
- Project
- Photoshoot day
- Editing
- Summary
How to do it within CreativeMindClass
- Simply click My Classin the main menu, to launch it.
- Select the the ADD CLASS button to add the course.
2. Course topic
Decide what you'll teach and whom you'll be teaching.
The process of establishing your own online photography class is stressful because you must find something people will want to buy. A well thought-out subject matter will set you up for success.
A subject for a course is an easy yet effective idea for designing the right course for the appropriate audience. Photography is your passion You have the expertise of skills and knowledge which your students are willing to invest in. Now is the time to examine it closer and put the experience into the words of others.
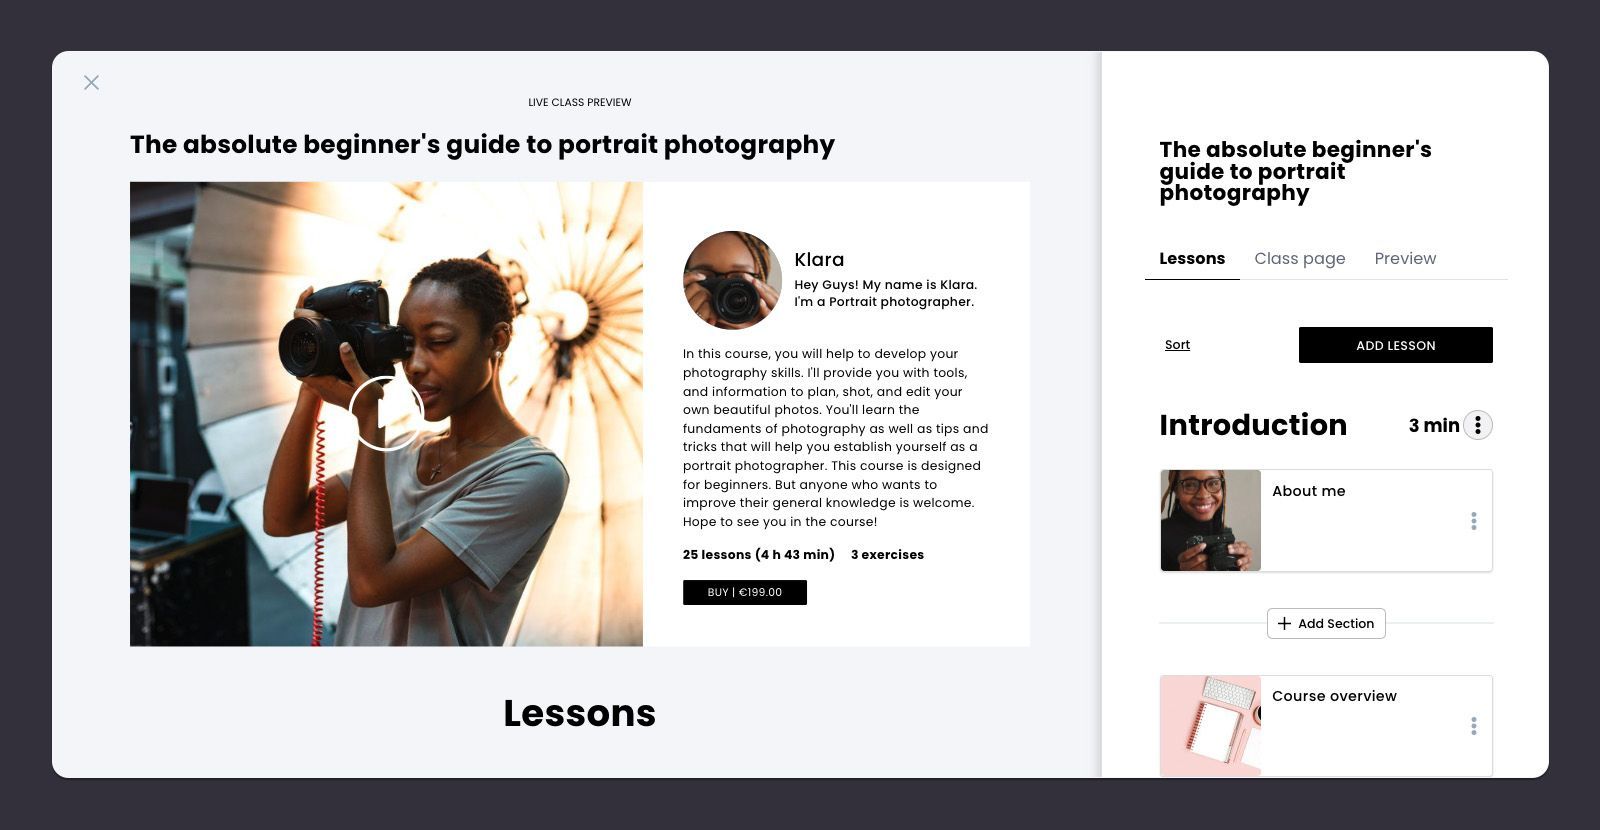
To begin, go to the Class page
There's a Class page tab under the class. Then click the class page tab to open it and start creating your course's name and description.
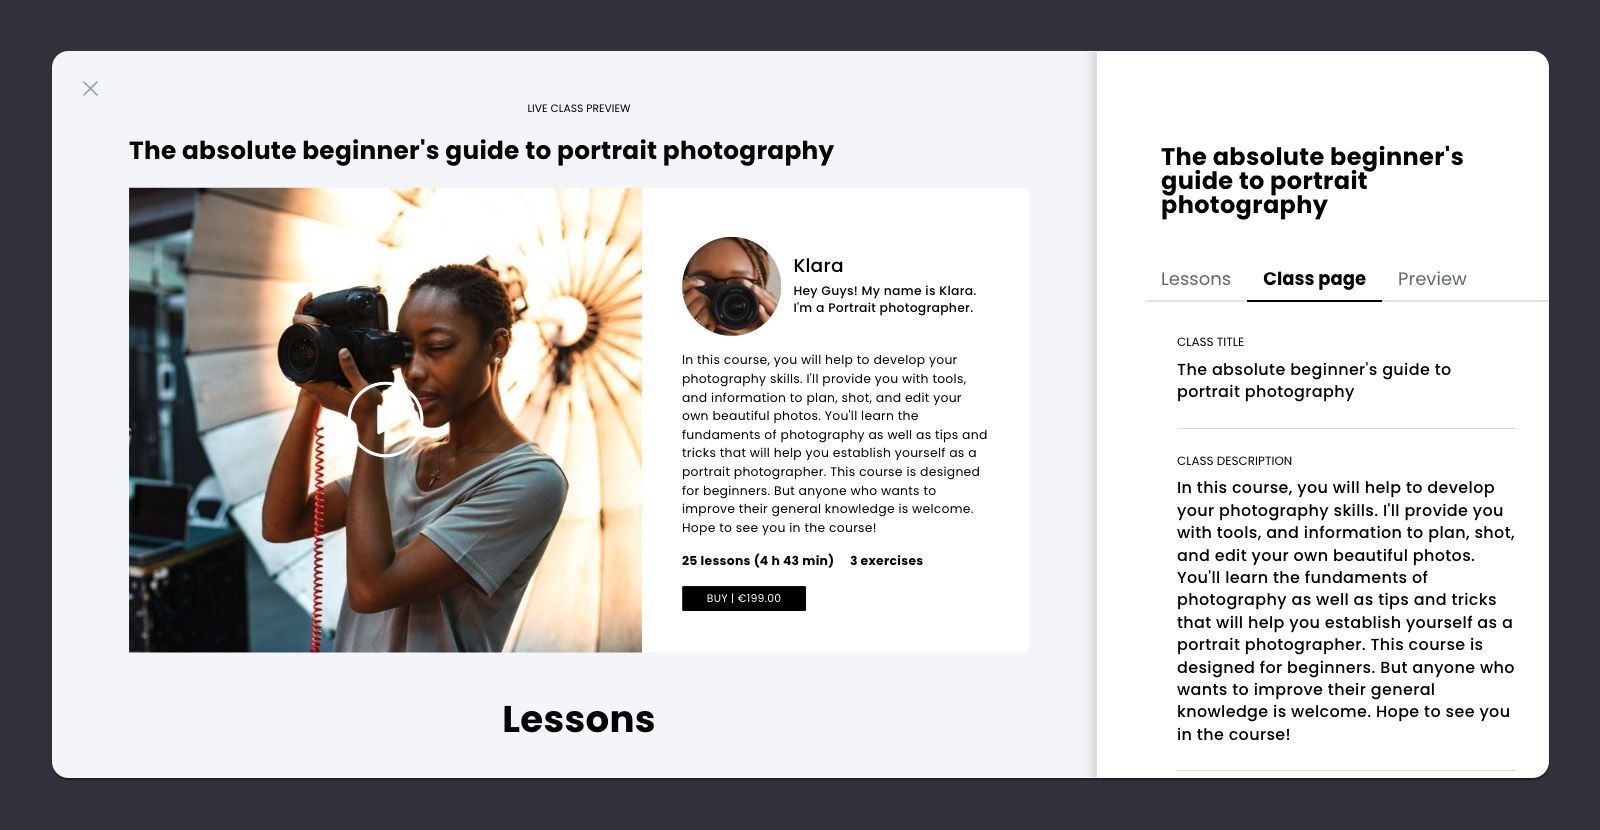
How to do it within CreativeMindClass
- Click the Class page tab to display it.
Indicate what you are expected to be teaching
What sort of photography do you do? What is it that you enjoy most about it? Do others turn to you for advice about? What do you want to know more about? This helps you to identify a subject you're most comfortable with which makes course development time much easier.
Pro Tip: Teach what you're passionate about, are familiar with, and what people want to understand. This way, you'll have an array of topics that you can begin putting together today.
Your course's name
A clear, catchy focused title that is benefit-focused helps users make an easy choice. It grabs interest and causes them to put down their scrolls and declare, "Yes, I want to buy it!". Utilize powerful words to create a reaction is what makes them read, click and buy.
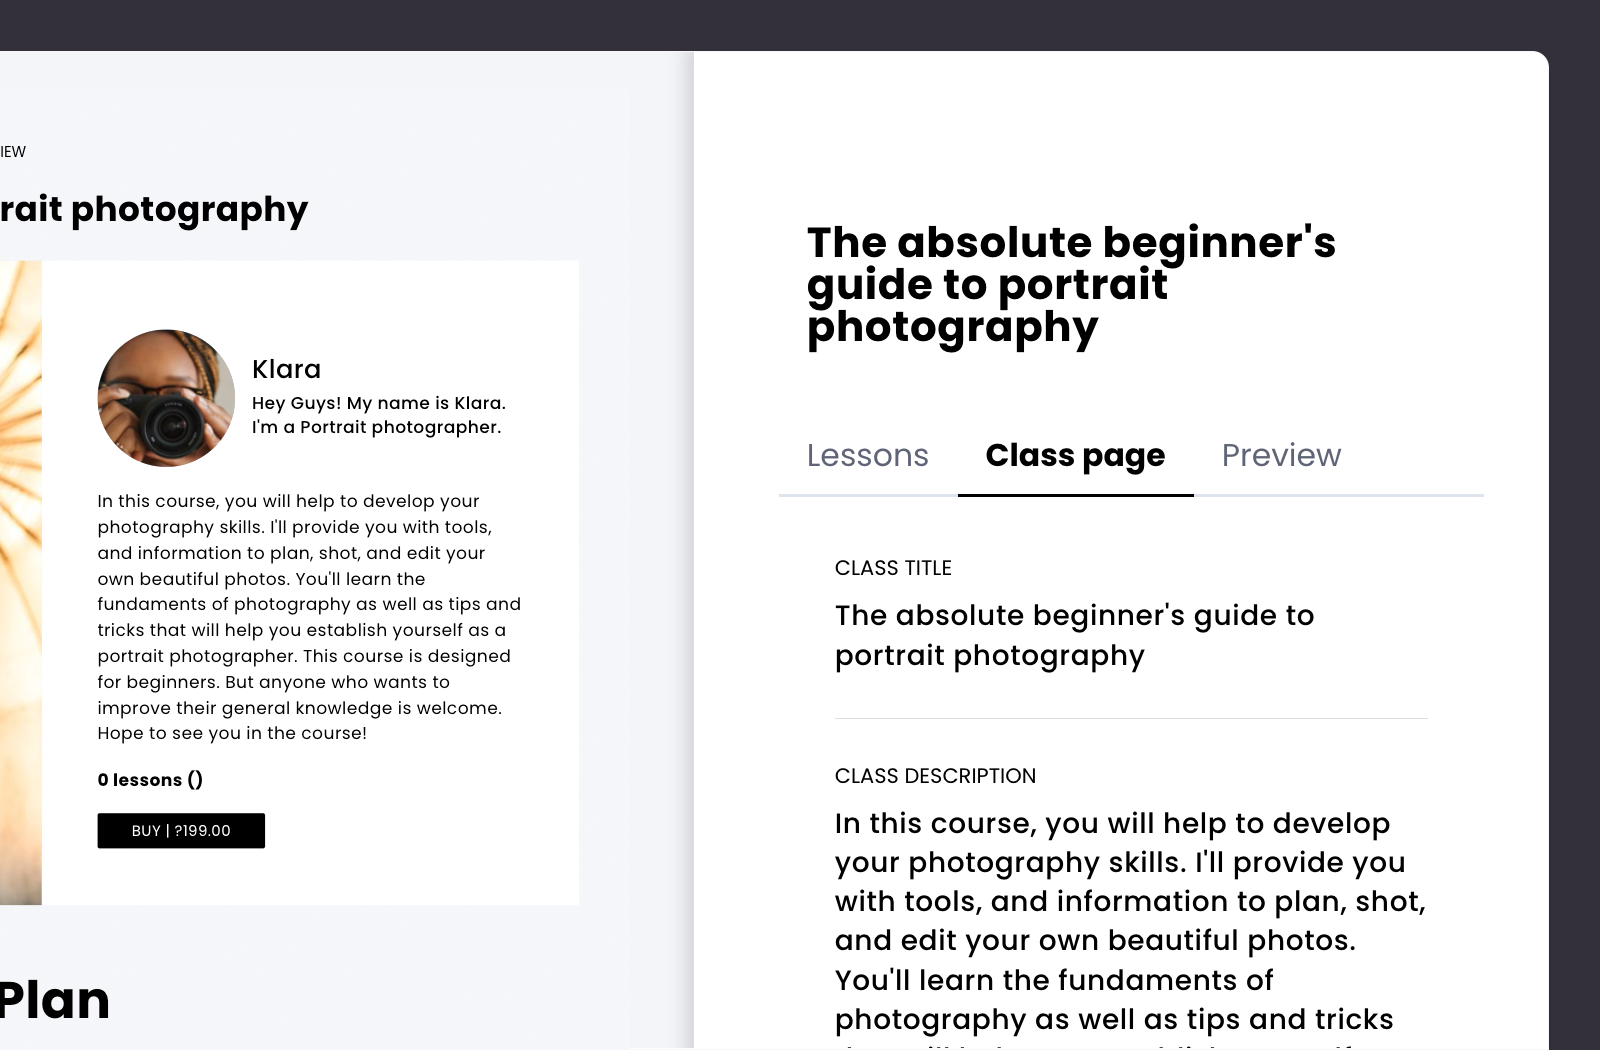
How to do it within CreativeMindClass
- Use the word CLASS TITLEto identify your class. Like "The complete beginner's guide to portrait photographer".
Make an offer (and locate people willing to purchase it)
What will people get to know? Do you intend to concentrate on editing or shooting? Who is a promising audience for this program? What are the specific issues that you tackle? Do any of your competitors offer similar courses? As you work on the offer, find someone motivated enough to spend money to learn about it.
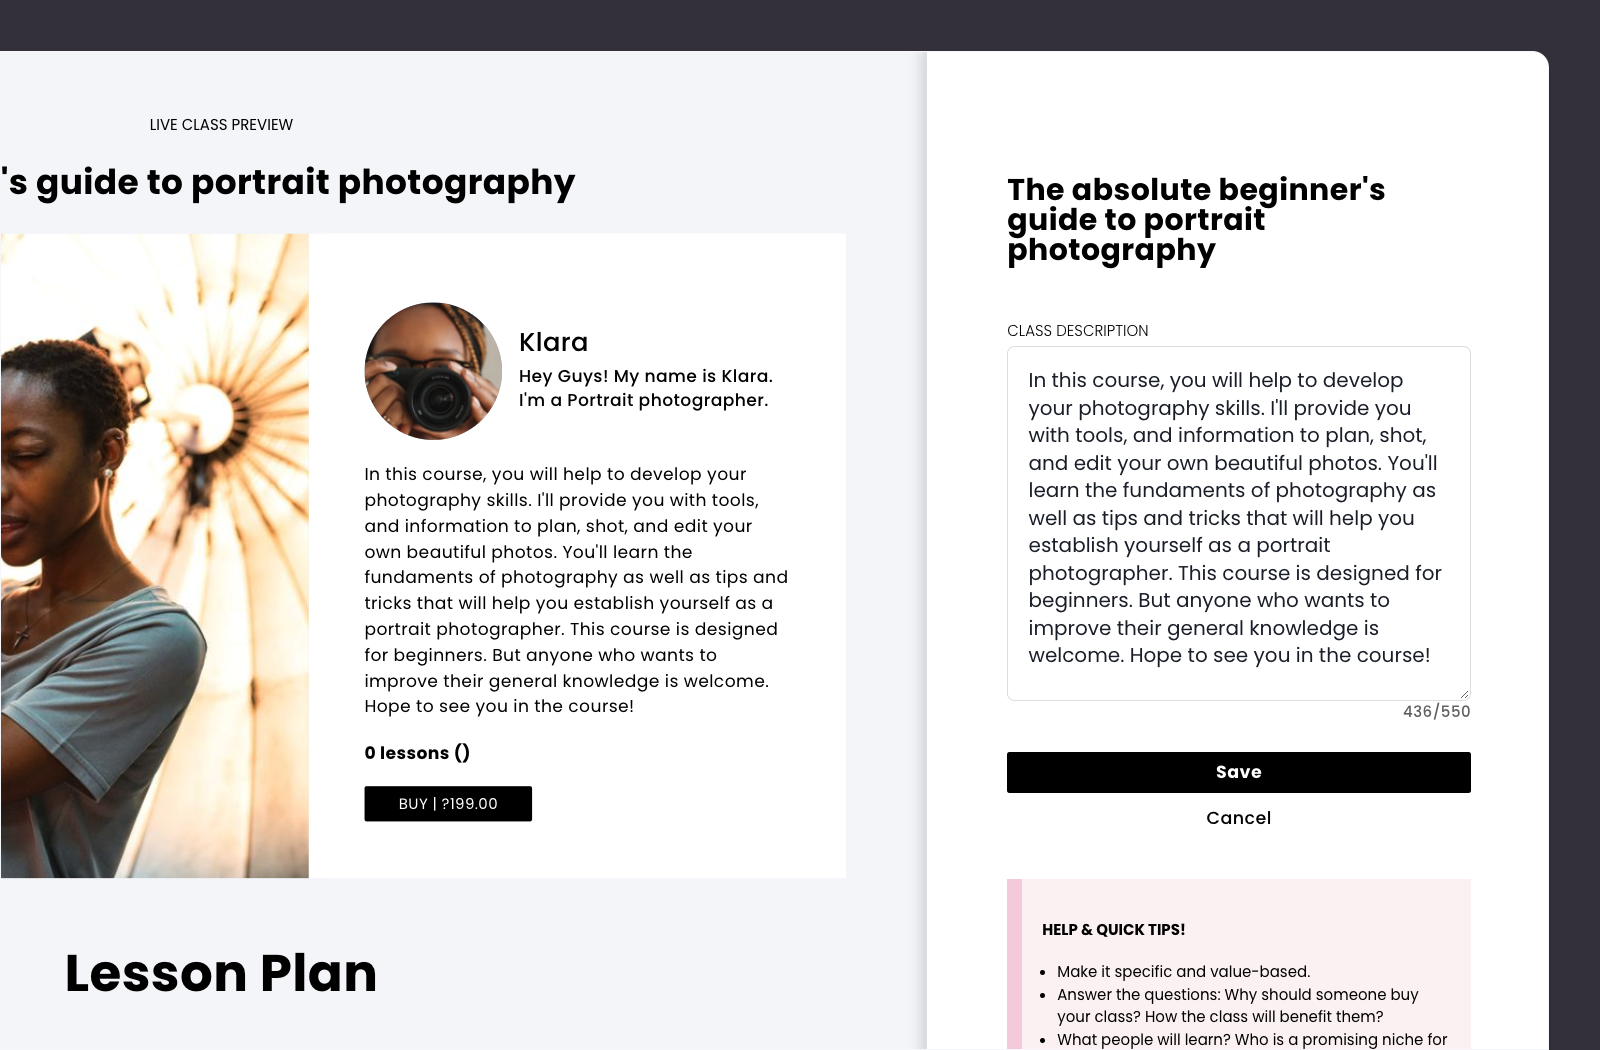
How to do it within CreativeMindClass
- Use the form CLASS DESCRIPTIONto make your offering.
You've finished the course topic!
When your subject is complete, you have an effective and real-world offer to your photography online course. Remember, you can create multiple classes to explore different course topics and try them out.
We'll then make a plan of action so that there's nothing you miss while recording the video...
3. Plan of the course
Plan each lesson you need.
Making the decision to design the entire online photography course could be daunting. With a lot of material to sort through, it is a source of uncertainty when deciding what content should be included in an online photography class. However, a clear plan of the course will ensure that it's manageable.
A outline for a course can be a checklist of every video you want to create during the course of filming your course. The outline usually includes a listing of particular lessons, with notes about content details and learning outcomes, so you don't forget a thing.
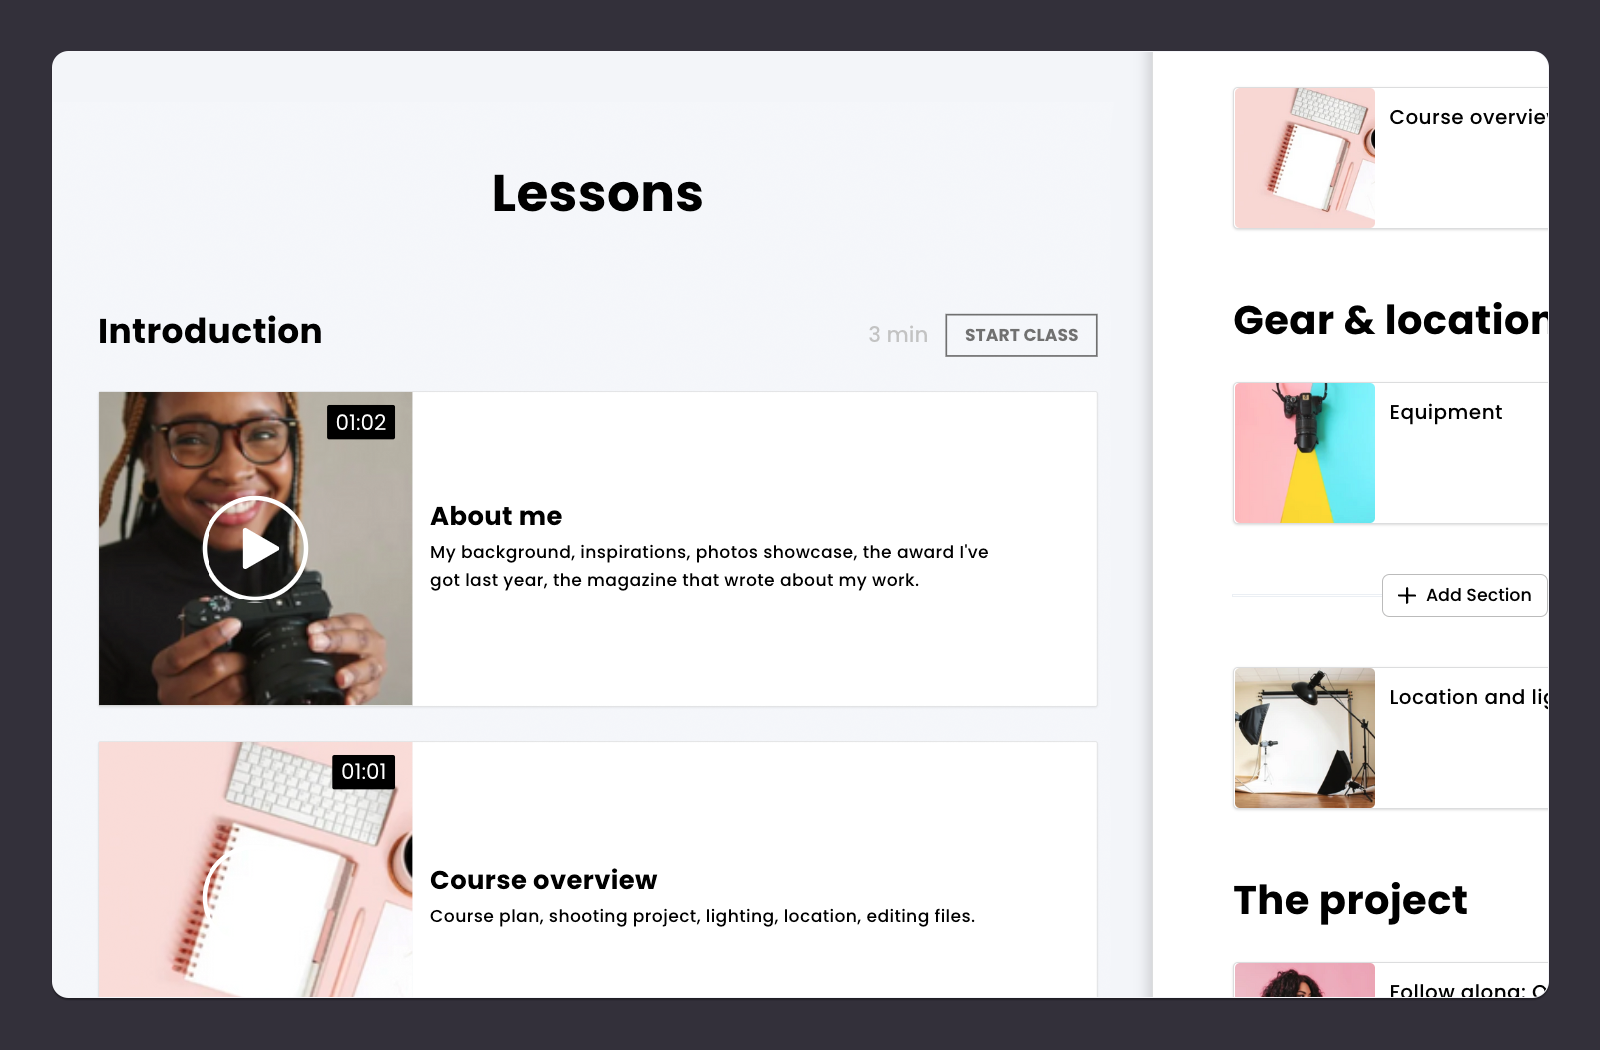
To begin, first, launch the Lessons
The Lessons tab under the class. Click to open the Lessons tab to open it and start creating your lesson plans.
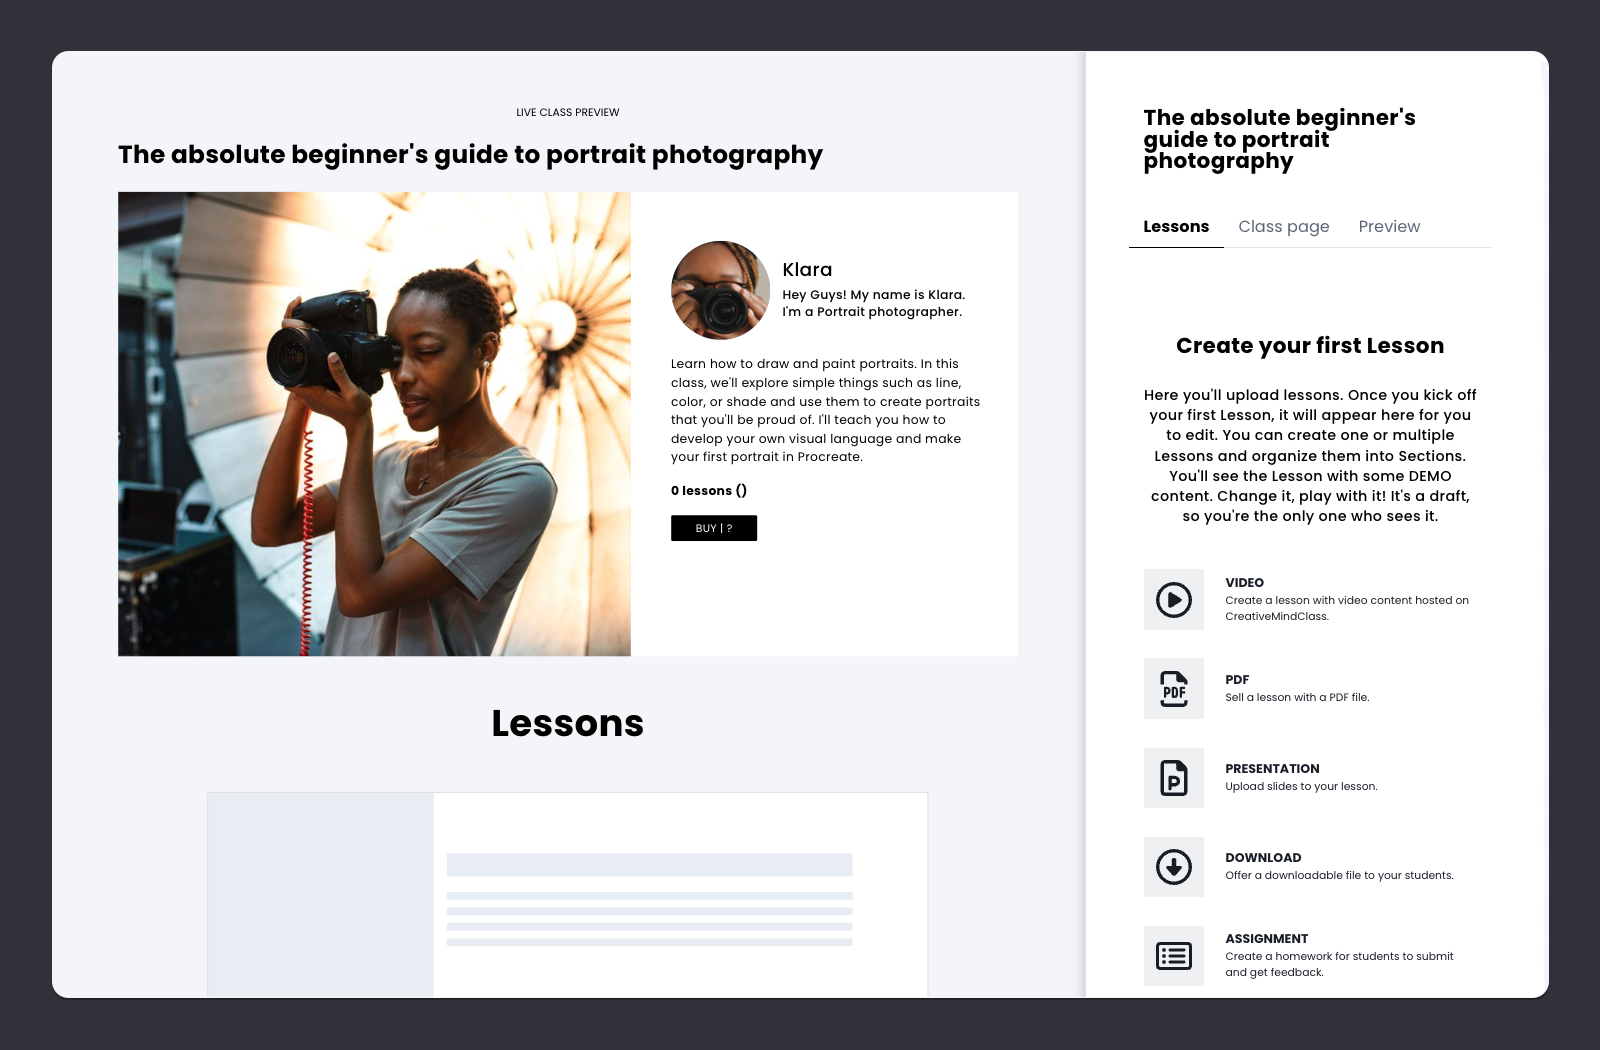
How to do it in CreativeMindClass
1. Click the the LESSONS tab to display it.
The things you're doing to cover
Begin by listing the main issues and topics you'd like to discuss. This could include introductions, presenting your finest work such as a course overview, the gear and lighting, hands-on work edits, post-production, and a conclusion. You don't need to go into the specifics yet. What topics could you be covered in 3-10 minutes video lessons?

What is it? in CreativeMindClass
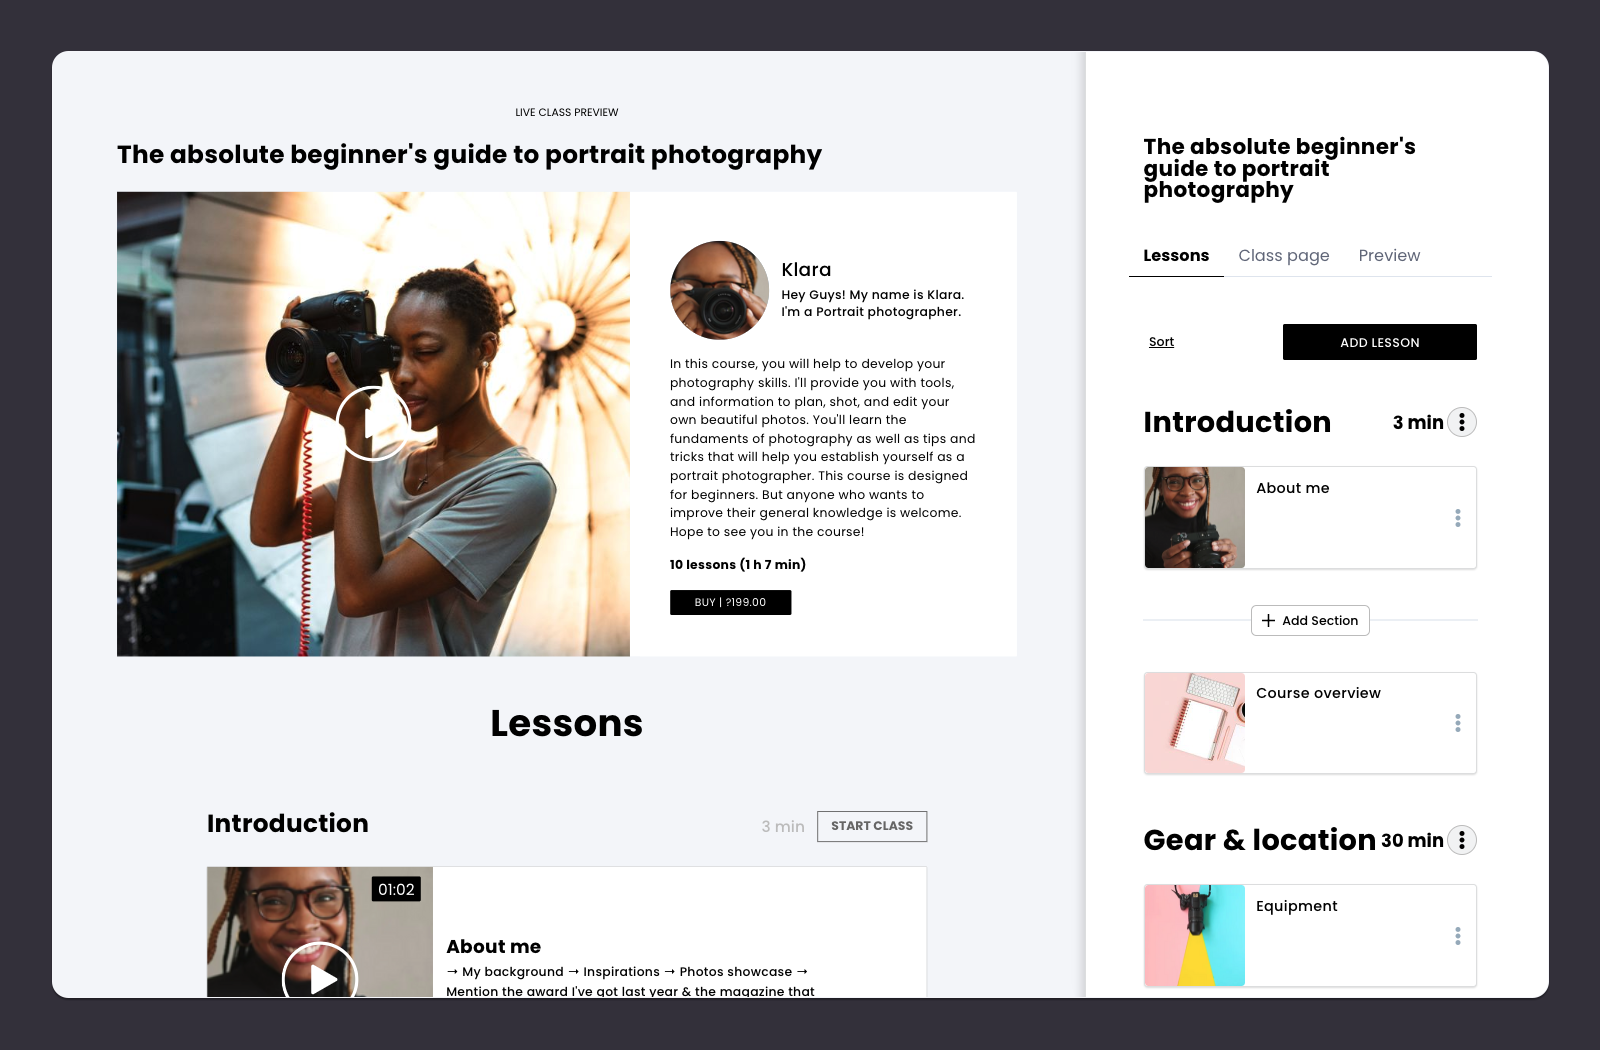
- Click the ADD LESSON click to create the new lesson.
- In Lesson page tab, type LESSON TITLE. Example: "About me".
- Incorporate 10-20 lessons into your class. Like "Course Overview", "Equipment", "How to master composition", "Editing", "Conclusion"etc. PRO TIP: It's best to list the subjects quickly and then type in the title of each lesson without pondering them too much. Then, you can edit them later.
Listing the learning results
This is the heart of the lesson plan. This is where you write down the most important elements of each lesson that you wish to record. Consider specific learning outcomes as well as content that addresses your audience's questions or figure out what gaps aren't being filled by competitors.
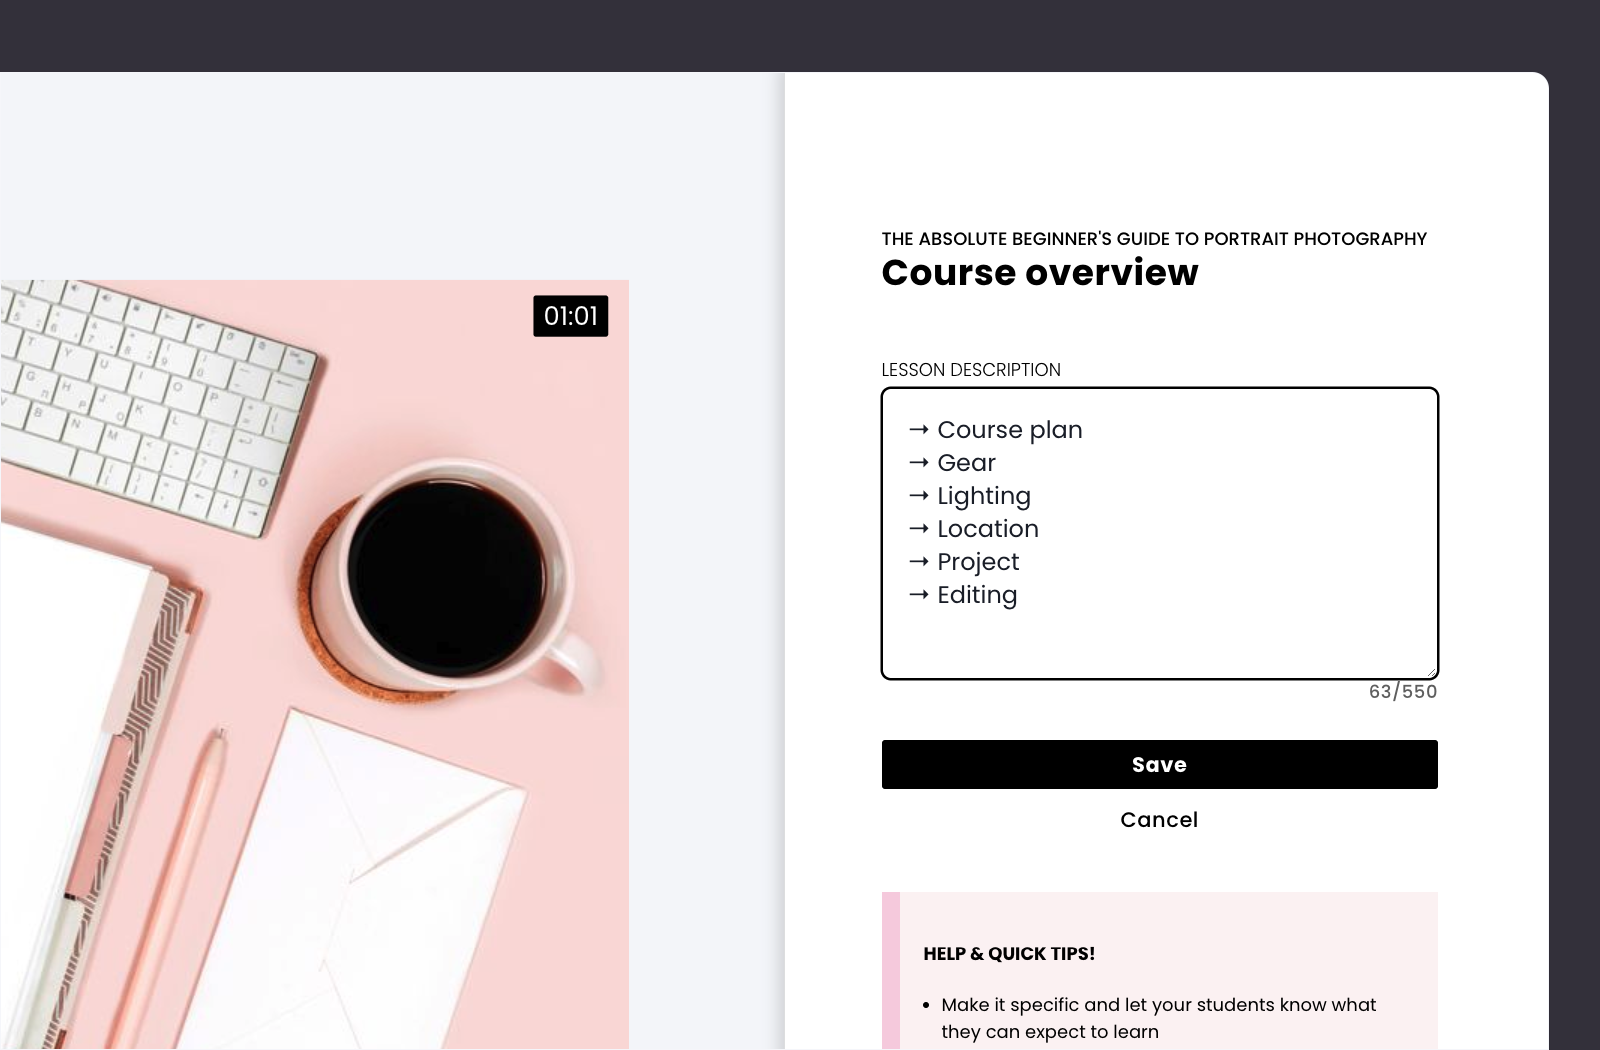
How do I get it within CreativeMindClass
- Click here to go to "Course Overview" lesson.
- Type LESSON DESCRIPTION to create your lesson outline. For example "Course plan, gear, lighting, location, project, editing ".
Change from chaotic to well-organized
It is possible that you have created a lists of lessons that it's too long or not clear. If you have lots of things to learn, you should consider the division of your lesson into parts. You can eliminate the material without a clear learning outcome. Make sure to take your time at this stage so it doesn't become a time-consuming task.

What is it? in CreativeMindClass
- Click the Add Sectionbutton to add a section.
- Type Title of Section. Example: "Introduction" section to include "About my self" and "Course outline" lessons.
- Create additional sections for your lessons . PRO TIP: Group together your common themes, suggestions and suggestions into segments. The lessons in those sections into the most logical manner.
Reference it on the day that the video was recorded
In the past, you printed your to-do list to refer to on the filming day. However, these days, a to-do list can be accessed on phones or laptops. So, you are able to make sure that each lesson is completed or adjust the list as needed.
You've finished the lessons of the list!
Once your outline of the course is complete, you are prepared for recording your video.
The next step is to discuss ways to record and deliver the content...
4. Content delivery
Make videos, files that you can download, as well as exercises.
Now that you have a outline of your course in place, it's time to think how you can present every aspect of your online photography class.
Video lessons are engaging, engaging entertaining content that provides a fantastic educational experience to students online. The most effective way to convey the learning results is to mix various forms of media: video, screen recordings, presentations, audio, hand-outs, and exercises.
Look at your lessons list. What is the best method for delivering the outcomes of every lesson?
Then, you must open the Lessons
You'll find the Lessons under the class. Click the Lessons tab to open it and start adding multimedia for each lesson.
What is it? within CreativeMindClass
1. Click LESSONS tab to display it.
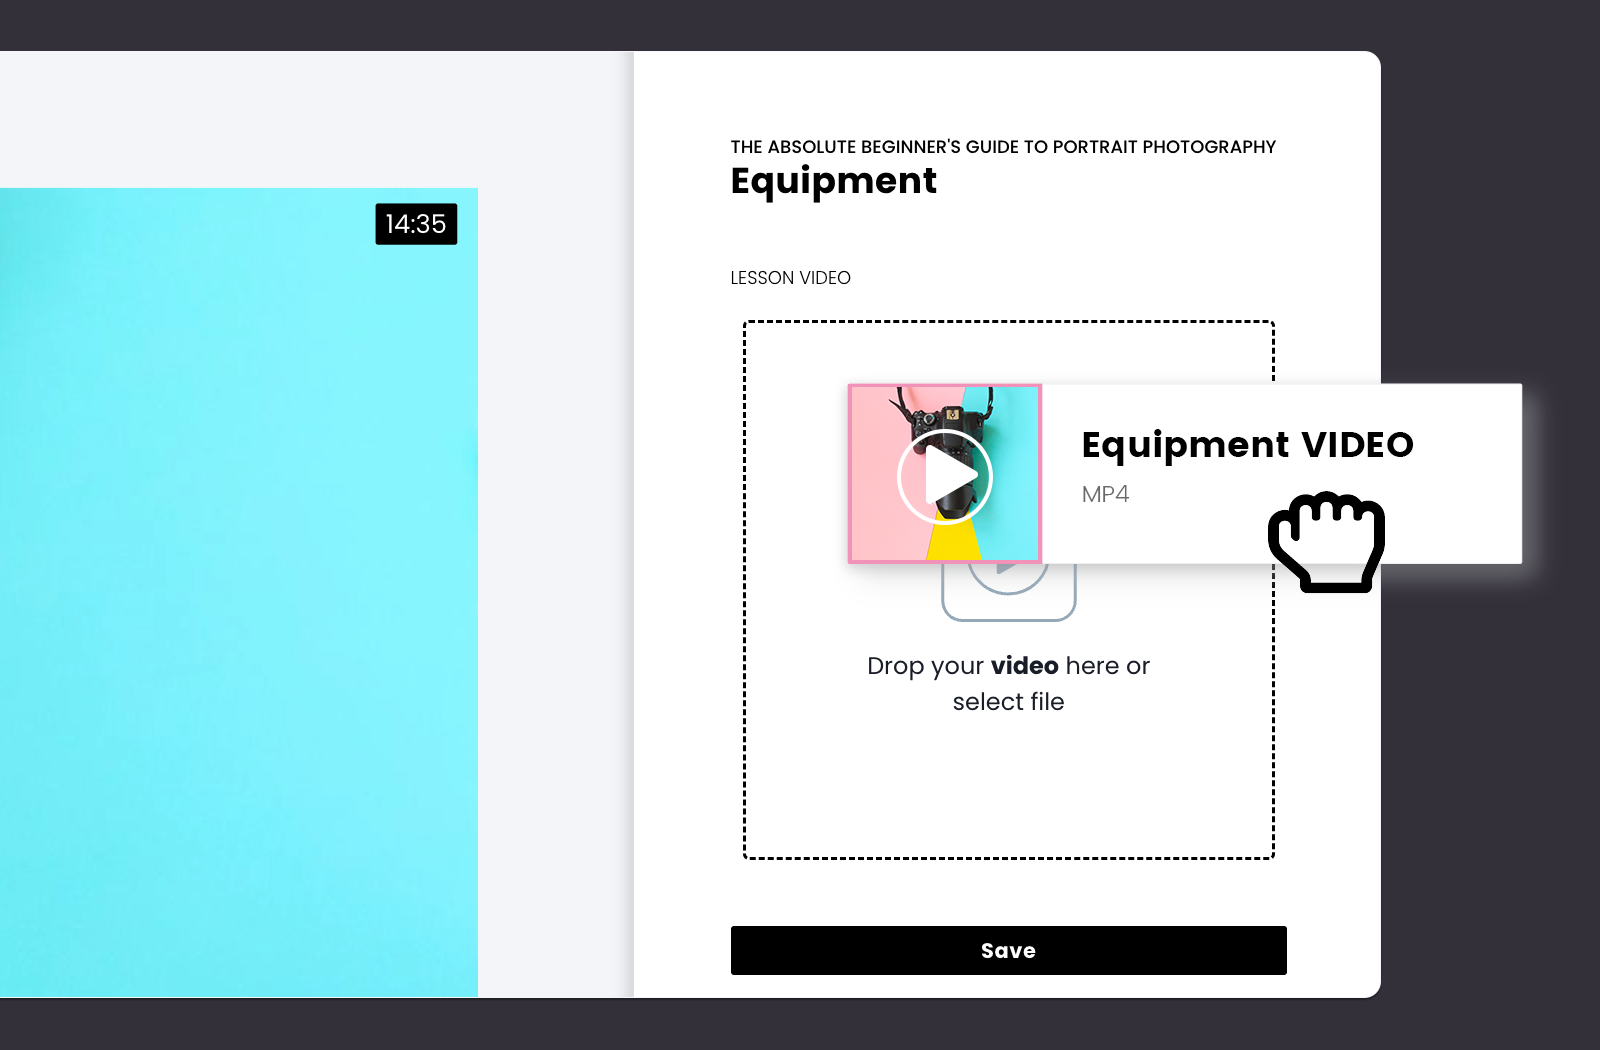
Add a video to each lesson
Videos are the most engaging method of presenting your information. Video can come in many forms, like presentations or screen recordings with audio It doesn't necessarily suggest that you have to be present in front of the camera all the time.
Photographers are fortunate that it is possible to purchase the camera for video and begin shooting. The videos you create can be created with the equipment and spaces at home using the knowledge you have available.
After you've finished editing and recording your videos there are a variety of low-quality, short 16:9 videos to upload. Remember the superior quality of the video. The resolution must be 1080p.
How do I get it within CreativeMindClass
- For LESSON Select the VIDEOlesson Type.
- Drag a video file from your PC.
- Add a video to every class. PRO TIP: Depending on the software you will use to create your video, you'll have a range of format options like MP4, MOV, or WMV. Don't worry about that, the videos will be automatically converted to formats that your students will be able to view on their laptops, desktops, or smartphones.
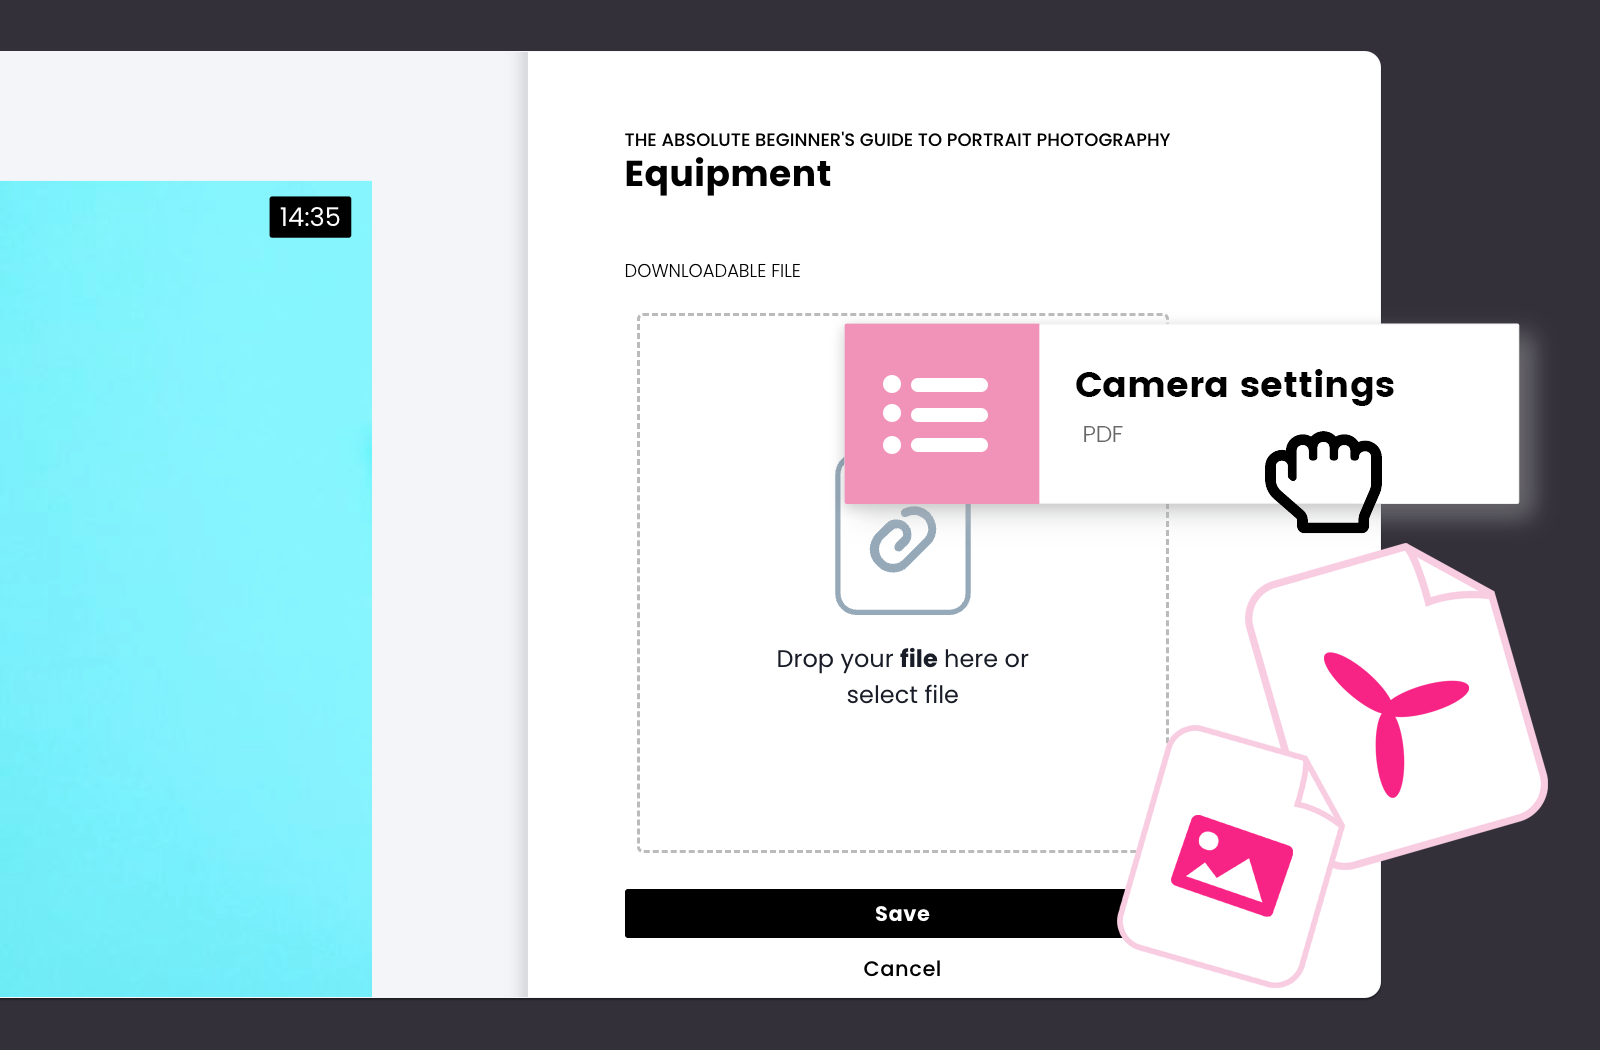
Upload a download file
Downloadable documents are an excellent supplement to your class. They make the content enjoyable and entertaining and make your mark on the desks and pulpits of your students. If you add an extra content to your class Students can download the file, print it or fill it out, or edit the file.
Video lessons can be created with additional files like worksheets or native files. Make downloadable documents using programs such as Pages/Word, Google Slides, Prezi, Photoshop, or Canva. Making downloadable files part of exercises allows students to bring their own files into a course and then receive your comments.
When you're done creating your downloadable files, you have high-quality image files or editable native file formats to upload.
How to do it in CreativeMindClass
- Navigate to the tab for Content of the lesson
- Click DOWNLOADABLE FILE to transfer your document.
Add an exercise to an existing lesson
Exercises are a great way to help students achieve their learning goals. Students are engaged in learning through doing. Active learning is typically comprised of an actionable task and instructor feedback.
Imagine the learning environment you'll create to help students achieve their goals. Look at your Lessons list. What lessons might have an engaging and fun activity to help students learn? What lessons might have homework tasks? Which brainstorming exercises can you include? What's the end-of-course task in your course?
How to do it in CreativeMindClass
- Navigate to the tab titled Content
- Click the EXERCISE button to make an exercise to teach your pupils.
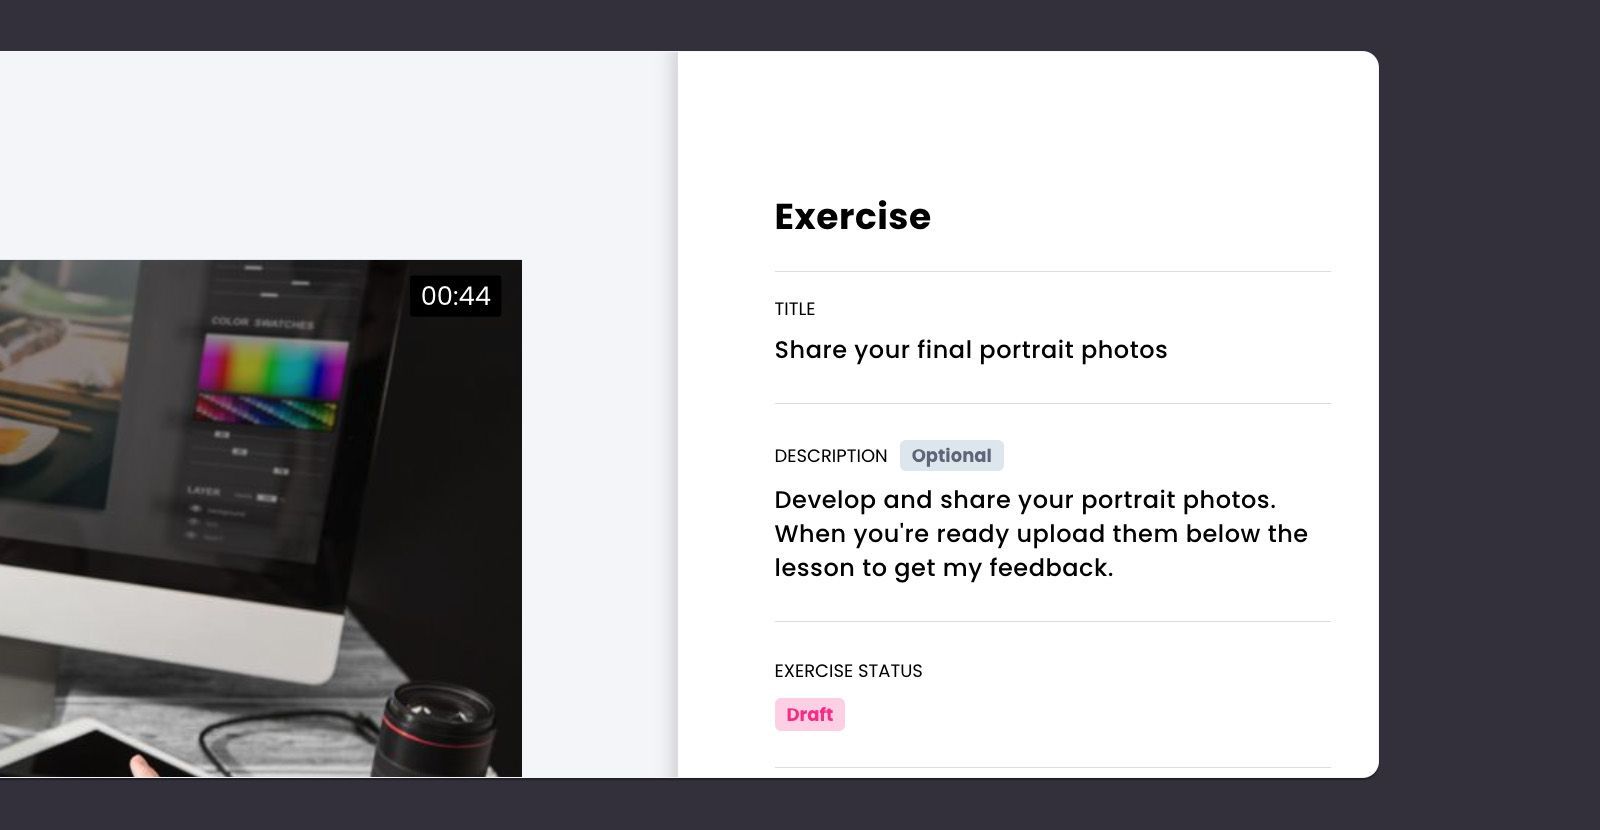
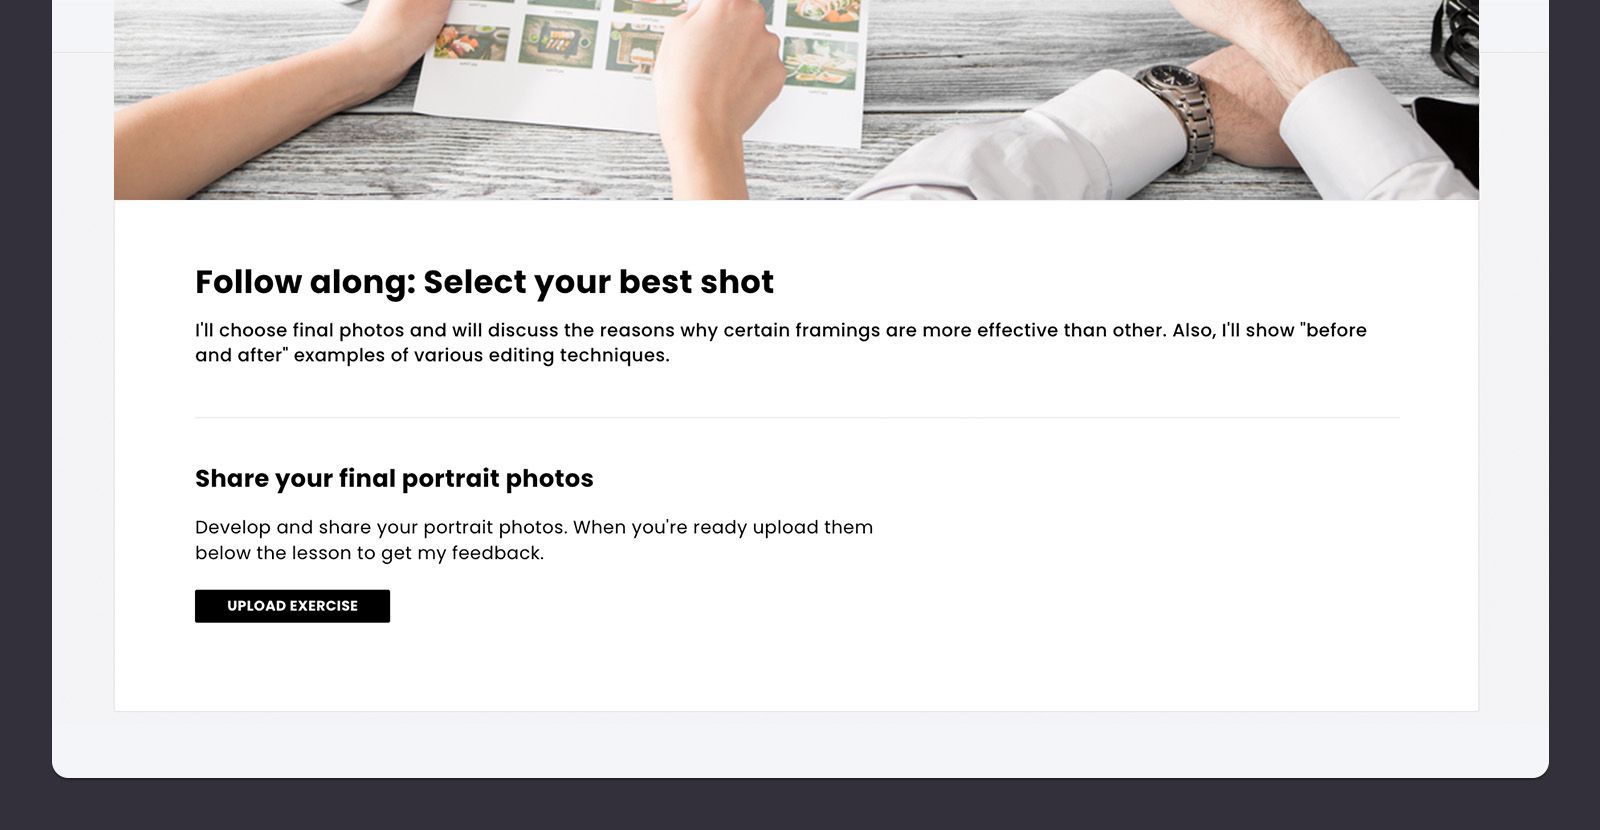
Ask students to share photos and receive critique
A photography online course will ask students to submit a final assignment, like making a photoshoot. When you add such exercise the students will be able to take pictures using the methods they acquire during the course as well as upload the photos into CreativeMindClass in order to provide feedback. Pro Tip: Students' end-of-course results of your photography online course may be uploaded in the form of exercises. These will then be added on the Activity Feed together with your feedback. It creates wonderful testimonials as well as social proof for your website.
What is it? in CreativeMindClass
- Navigate to LESSON - Content tab
- Click EXERCISE to generate an exercise.
- Write TITLE. For example "Share your final portrait photos".
- Write a DESCRIPTION. In this case, for example "Develop and share your portrait images. After you're finished, you can put them up under the lesson and get my feedback ".
- Once your student has uploaded their assignment, go to students' workto offer your comments.
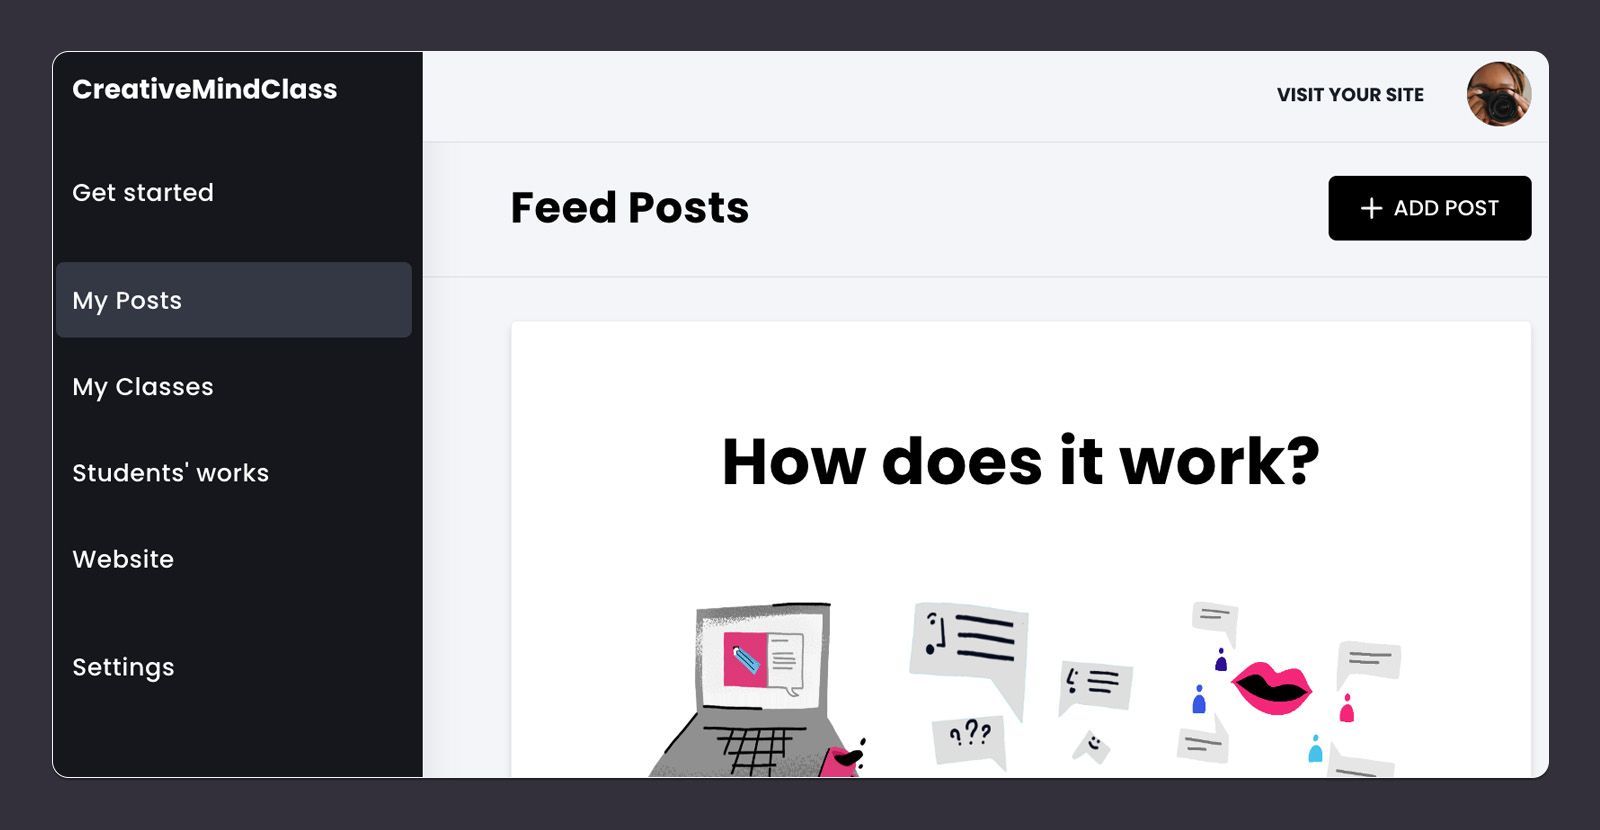
Build an online community to promote your course
Your feedback and learning activities are the first steps toward building an engaged community around the online course you offer. It is possible to stop there or take your learners' learning experience to the next level. This helps to improve your business's performance and expand your brand reach.
Activity Feed can be a great way to establish an internet-based community. It increases visitors to your course's site, assists in keeping customersand increase the amount of money you earn.
If you include some inspirational blog posts on your course's website, you'll be able to create a great base for building an active community around your brand and business.
How could you keep your students interest? What do you usually post on social media? What advice would you like to give about composition, gear software, or composition? One way to keep students interested and motivated to complete your course is posting daily that provide inspiration in the final work.
What is it? in CreativeMindClass
- Click My Postsin the main menu, to launch it.
- Click the the ADD POST button to make an entirely new blog post.
You've finished preparing the content!
Now that your content is ready, you have an effective online photography course. The course needs a location.
The next step is to write copy and upload visuals to your course website...
5. Site for Course
Persuade your audience to buy using text and images.
Just finished recording your videos and you're sure you've made incredible lessons. It's time to package and sell your video lessons. One of the easiest ways to do this is to build your own website (sometimes called a sales page or an e-commerce site).
A website which is simple and benefits-oriented can help you sell your course. Why should someone choose you over another course? It's all about the promise to your customers. Pages that convert well typically have captivating copy as well as images that demonstrate all the benefits and closing by a clearly defined call-to-action.
First, open the Web site
Visit the Website to open it and create your headline, image, and copy.
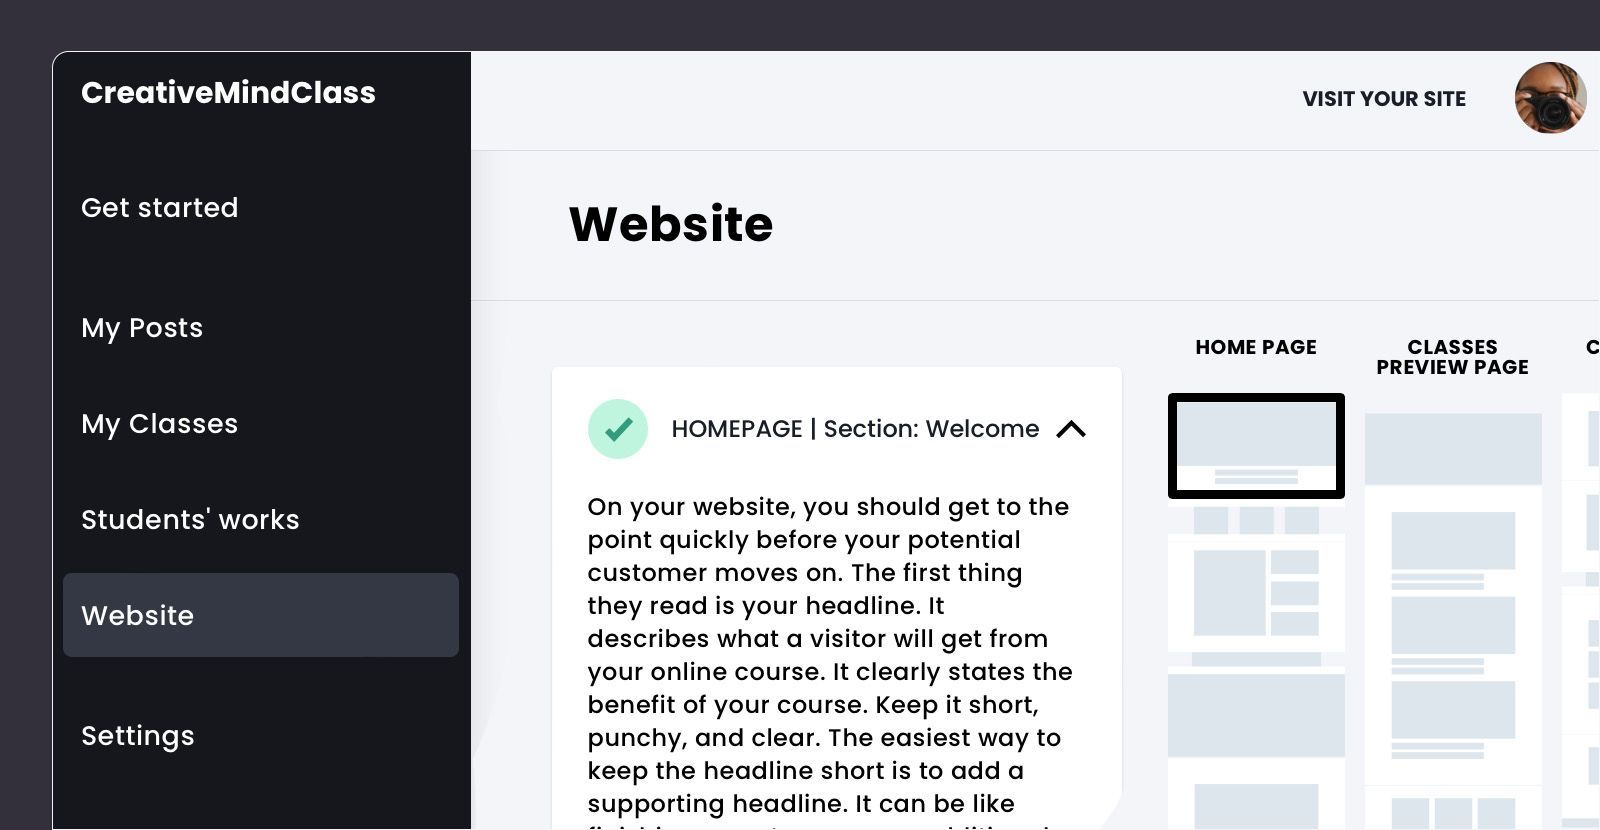
What is it? within CreativeMindClass
- Click websitein Main Menu to launch it.
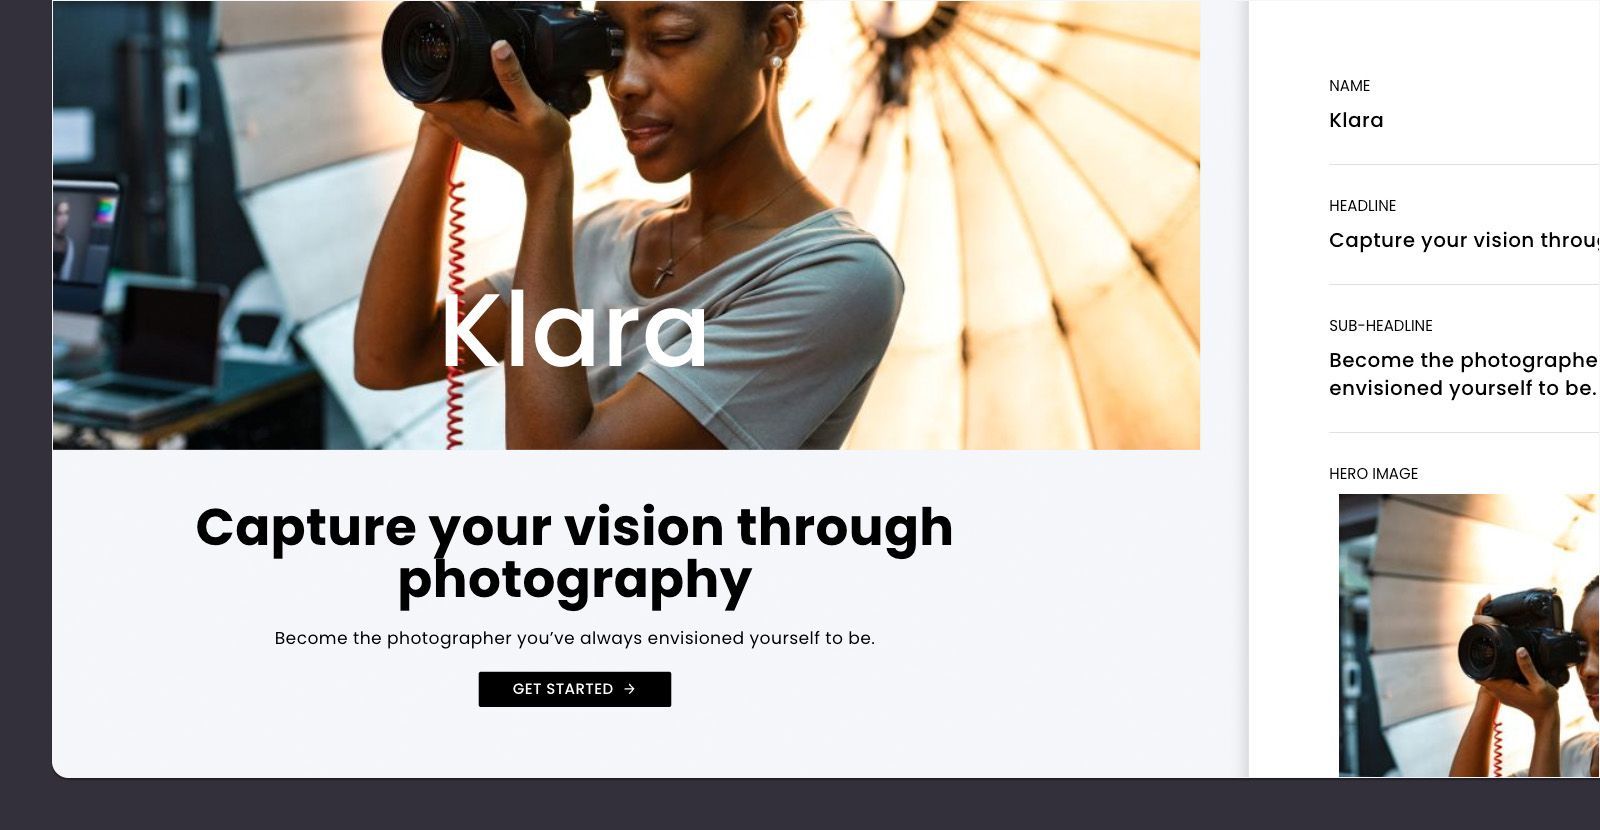
Get the attention of the viewer
When you are creating your site, you should get to the point quick before your prospective customer moves on.
The first thing visitors see is the headline. The headline explains what visitors is going to get through your online photography class. It clearly outlines the benefits of the course.
Be sure to keep it brief, punchy, and clear. One of the easiest ways to ensure that the headline stays brief is to include an accompanying headline. This can be similar to finishing a sentence or an additional sentence supporting the principal sentence.
How do I get it in CreativeMindClass
- Click Edit button located in Welcome section.
- Use the HEADLINE. Example: "Capture your vision through photography".
- Write a the SUB-HEADLINE. In this case, for example: "Become your own photographer you've always wanted to become".
Add inspiring visuals
The hero image (or background videos) you place on the top portion of your site will help the visitors to understand what you have to offer.
What does the hero image says about the value of your online photography class? Place your potential customer in a scenario you've prepared to help the course. If you've prepared a course like making dog portraits, you can make an image collage or background video with your final images. Images should be big as well as crisp and clear.

How to do it in CreativeMindClass
- Click Edit button on Welcome section.
- Click HERO Image, BACKGROUND VIDEO or ANIMATIONto add your visuals.
Start your class
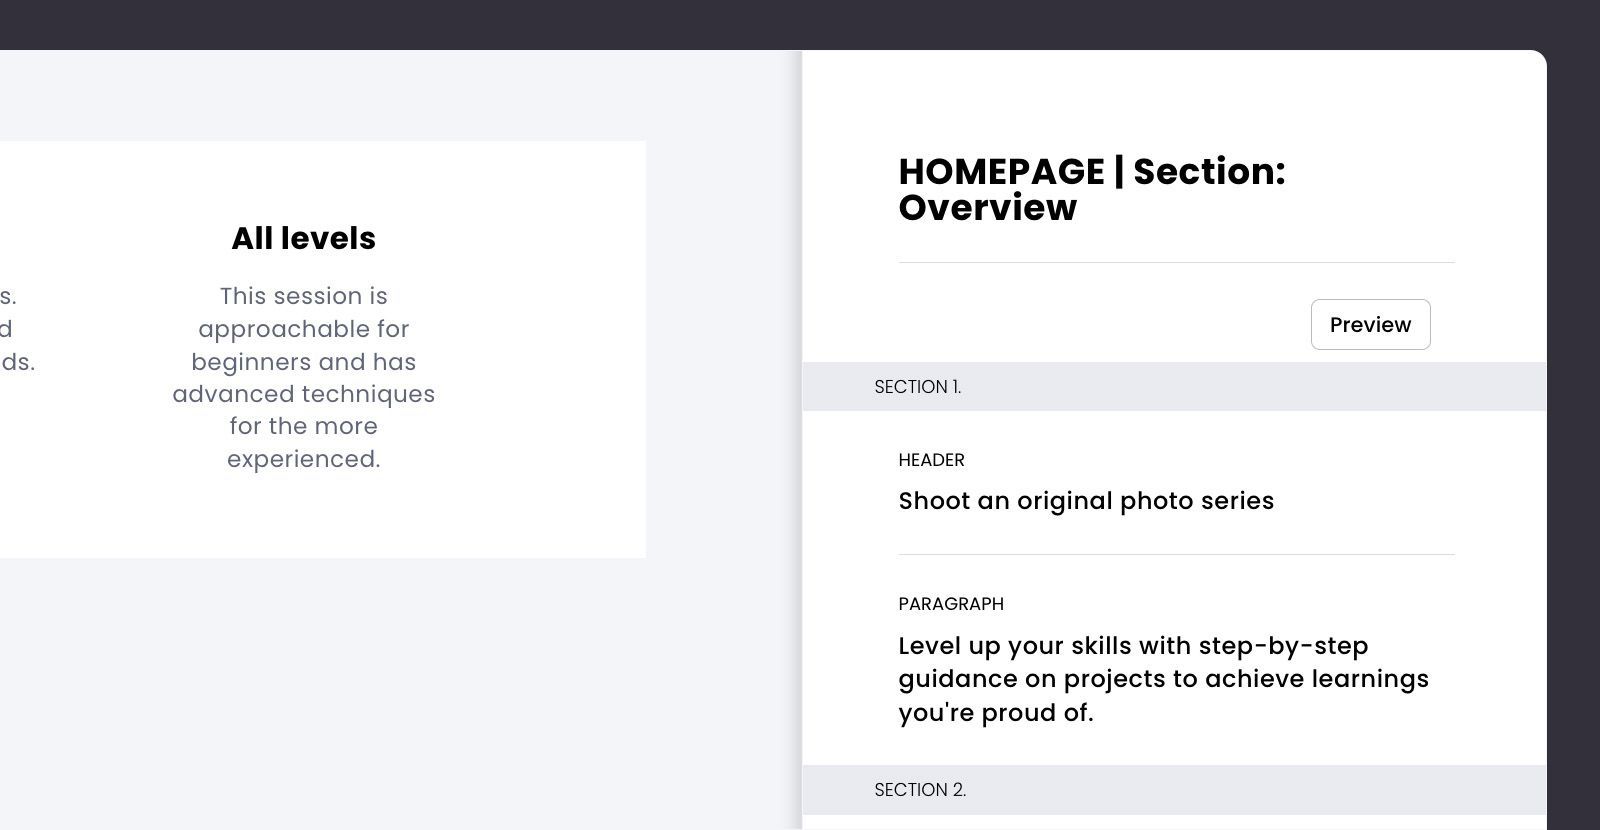
Include some general information regarding your online photography course.
What is it? How long will it last? What number of lessons are you offering? Do you give any bonus material? What's the class project? Who will the class be for?
The information provided helps customers who browse your page quickly understand what they're buying.
How to do it in CreativeMindClass
- Click the the Edit button in the Overview section.
- Type HEADER. Example: "Shoot an original picture collection".
- Enter a PARAGRAPH. Use PARAGRAPH.For an example "Level increase your knowledge with step-by-step guidance on assignments to attain learnings that you're proud of".
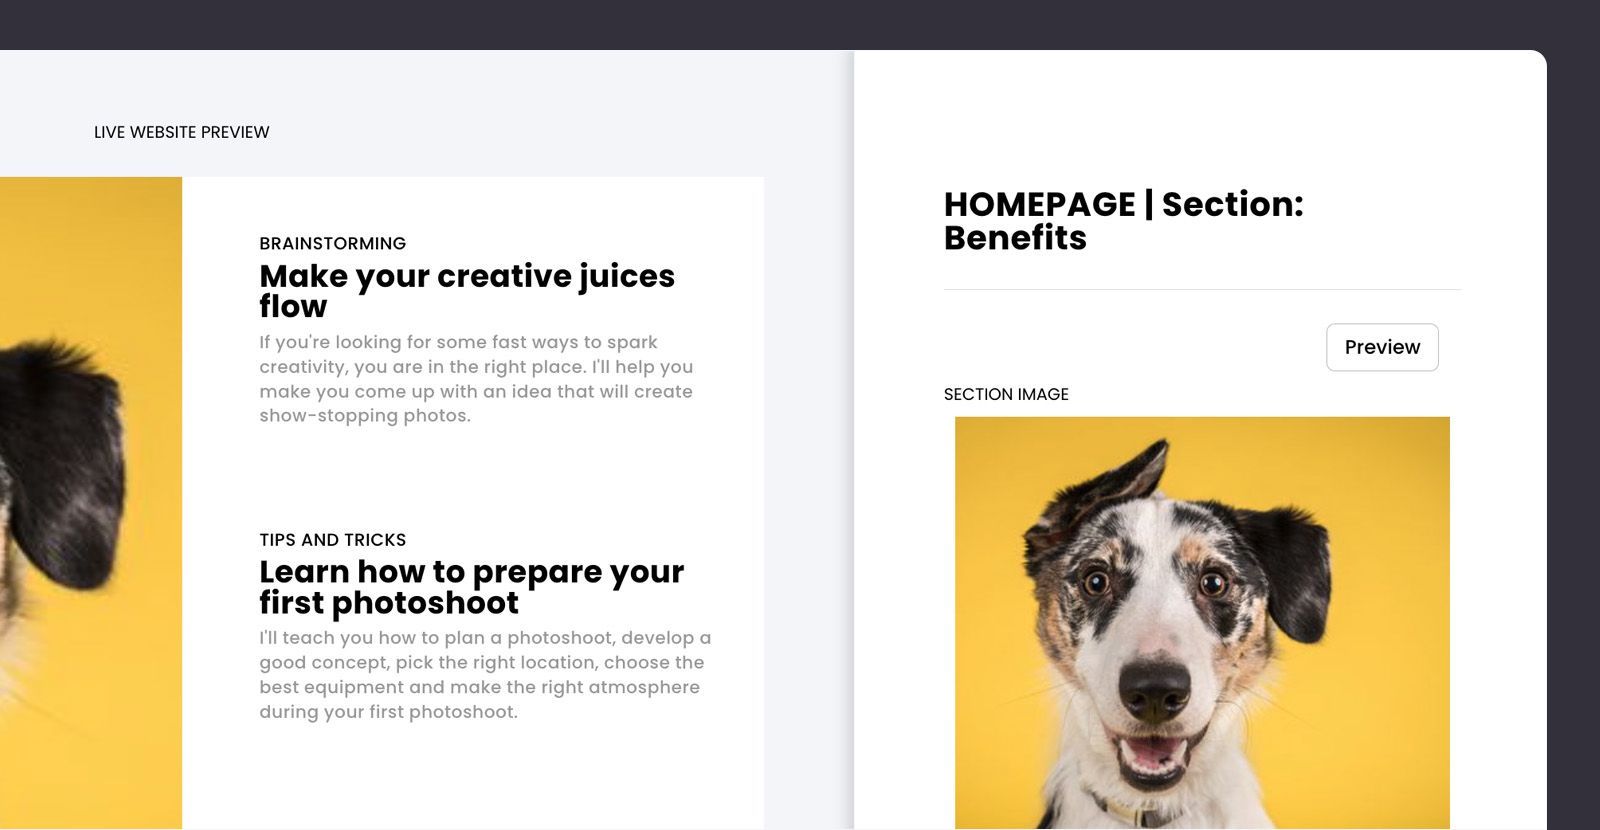
Highlight benefits
A clear and concise description of the benefits will persuade the majority users. Give more details regarding your class, its results of the course, as well as its worth.
What are the skills they will acquire? How would the course benefit the student? What are the changes they will go through? What issues do you have to solve?
The easiest way to highlight the benefits of a product is to compose the benefit in a concise, lively and concise header. Add a second subheader supporting the primary statement. In your paragraphs, write shortly about the key Learning outcomes and then write your value in plain language. you're providing.
Another way to highlight benefits from your program is to make use of an appealing image.
What is it? within CreativeMindClass
- Click the to edit button in the Benefits section.
- Type HEADER. Example: "Make your creative juices go".
- Use the Type Sub-Header. As an example, "Get an incredible concept".
- Enter a PARAGRAPH. For example "If you're searching for easy ways to stimulate creativity, you are in the right spot. I'll help you make you think of ideas that can result in show-stopping photos ".
- Click SECTION for IMAGEand upload your photo. TIP: Make sure you focus on 3 main benefits. Make the text brief and easy to hold readers' attention. Removing anything which is difficult to follow.
Try a little taste of your class
Someone who is scrolling through to purchase your photography online course would like to see a sneak peek of what's inside. Create a stunning promo trailer. If you want to create a promo trailer you can create a cool and dynamic video of 30-60 minutes.

How to do it within CreativeMindClass
- Simply click My Classesin the menu bar to open it.
- In class, click the the Class page tab and it will open.
- Click VIDEO TRAILERto upload your promo video.
Share it with your followers
Congratulations! When you've completed your course website the photo course online is completed. It's an exciting time after all your hard labor.
Another type of work starts! Now is the time to share your work with your followers. Add the link to your website as well as social media, email, or blog, and start the promo campaign. PRO TIP: Before you share the course with your audience, make sure that all of your classes, courses, and assignments are published.
What is it? within CreativeMindClass
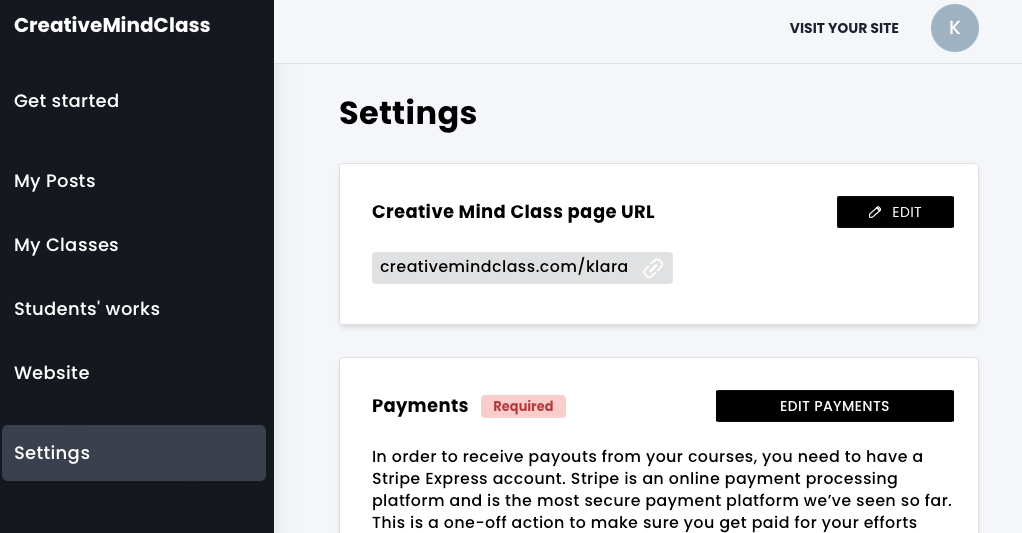
- Go to Settingsin main menu menu to start it.
- Copy CreativeMindClass page URL.
- Share the course with your students.
You're all done!
Hope this guide has helped you become more organized and provided you with the necessary opportunity to create an enjoyable learning environment for your pupils.
If you are starting an online photography course you can use this template to get set up within minutes. It's the perfect efficiency when it comes to creating an online course. It's built to be able to convert (sell your online course), and it's got all the necessary elements waiting to be finished. Slap on your photos, update the copy and images, and voila! Your new course is a success. online photography program. It's really that easy.
Design your photography online class online. Today.
Start for free by using our template.

- Start creating your photography course
Register for free, with no limitations on time SHARE The link was copied!
You might also like

How Do Online Courses Work and Why Should You Care?
![Best Platforms to Create and Sell Online Courses [Updated August 2022]](https://nofucksgiventoday.com/content/images/2022/11/online-course-platforms-1.jpg)
Most Effective Platforms for Creating and Sell Online Courses [Updated August 2022[Updated August 2022]

The Mini-Course: The Most Effective way to Get Started with Online Courses

How to Create an Online course

The Beginner's Guide to Selling Online Courses
Teaching with video as well as feedback, exercises and other materials on a standalone platform Get started today and create inspirational online classes and sell globally Create your own course and it's absolutely free! No credit card is required
CreativeMindClass is a growing community of creators, teachers and students alike. They connect on the learning platform to create and teach, to learn to connect, and incite.
Teaching Platform
Magazine
- Beginner's Tutorial
- about the blog
- Submissions
- Newsletter The CreativeMindClass Blog (c) 2022. All rights reserved.
Article was posted on here